Basic
WW2OL Setup
In this section I am going to try and list some of
the basic things you should try if you have just tossed a game
in the machine and it isn't working right. This assumes you haven
done anything yet. These may be in no particular order.
Then again, maybe they are...
My Computer:
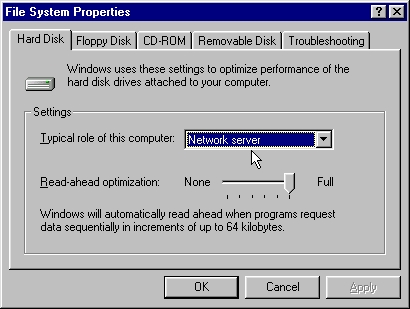
You should set your computer's role to that of 'network
server'. To do this, right click on My Computer, click Properties,
click the File System button. On the Hard Disk tab, set the role
of your computer to Network Server. Its probably set to Desktop
Computer. Also make sure Read Ahead Optimization is set to Full.
Setting your computer to Network Server changes some disk cache
settings and shuts down some (usually) useless, performance-robbing
Microsoft apps that run in the background. Click Okay and go back
to the System Properties window. On the Performance tab, click
the Graphics button and make sure Hardware Acceleration is set
to Full. Click Okay and go back to the System Properties window.
 Enabling Direct Memory Access (DMA)
DMA allows your hard drive to bypass the CPU and feed
data directly into memory. This frees up CPU cycles for doing
more important things and gets data from hard drive and into memory
a bit faster. You have to have a DMA or UDMA (U for Ultra) IDE
hard drive, and a bus master IDE controller to use DMA, but the
easy way to find out is just look and see if the DMA checkbox
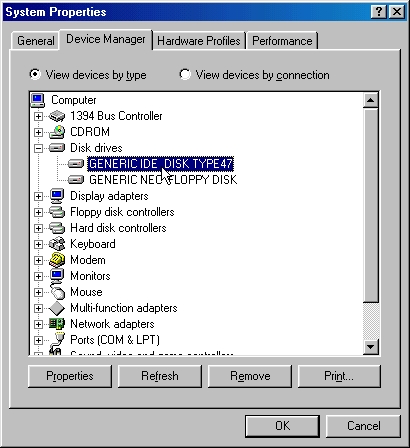
is in the hard drive's properties. Right click on My Computer,
click Properties, click the Device Manager tab. Find the line
with Disk Drives and click the + sign next to it. You should see
something like the photos, an entry that says 'Generic IDE disk
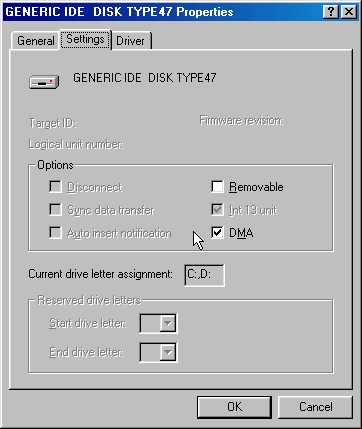
type47'. Highlight it and right click on it and choose Properties.
Click the Setting tab and make sure there is a check in the 'DMA'
box. Exit out and reboot.
Enabling Direct Memory Access (DMA)
DMA allows your hard drive to bypass the CPU and feed
data directly into memory. This frees up CPU cycles for doing
more important things and gets data from hard drive and into memory
a bit faster. You have to have a DMA or UDMA (U for Ultra) IDE
hard drive, and a bus master IDE controller to use DMA, but the
easy way to find out is just look and see if the DMA checkbox
is in the hard drive's properties. Right click on My Computer,
click Properties, click the Device Manager tab. Find the line
with Disk Drives and click the + sign next to it. You should see
something like the photos, an entry that says 'Generic IDE disk
type47'. Highlight it and right click on it and choose Properties.
Click the Setting tab and make sure there is a check in the 'DMA'
box. Exit out and reboot.
 Clean that Hard Drive!
A big part of getting WW2OL to run well on computers
with less than 512 megs RAM (or more, in some cases) is getting
the hard drive running as well and as fast as possible. This is
because WW2OL uses a LOT of virtual memory...virtual memory, or
swapfile, are located on the hard drive. When you hear your hard
drive churning away in there while you are playing, it is accessing
the virtual memory. The faster we can make it do this, the less
FPS spikes we will get. I'm not going to go into partitioning
here, but we can still make sure the drive is running good as
it is. The first thing to do is go thru and get rid of programs,
games, and files you no longer want manually. Be brutal. Anything
you dont use, trash. Any games you have on CD, get em off yer
computer if you dont play em often. Throw out as much as possible,
this isnt about saving room, its about making the drive work more
smoothly. The next thing to do is get a file system cleaner like
System Mechanic from Iolo
and scan for old, dead files. Delete them all. The next thing
to do is to...
Clean up your registry:
Your registry is like a phone book for your computer.
The registry assigns addresses to files and then programs on your
computer use the registry to find the files they need to run.
These files' addresses change sometimes, and the registry updates
itself to those changes, but it does not delete the old addresses.
So when a program needs a file, it goes into the registry and
sees the first address, goes there, finds no file, thinks "hrmm",
and goes back to the registry, where it finds another address.
It then goes there, finds no file...this repeats until it finds
the file it wants or it times out and the program or your entire
computer crashes. There are literally dozens of good registry
cleaning programs out there. The one that comes with Windows kinda
sucks. The registry is the cause of a lot of problems.
Things like peripherals (joysticks) not working, program conflicts
that cause lockups, crashes, blue screens of death, ect. System Mechanic does a great job of cleaning
up the registry. Scan for bad references and then delete ALL of
them. Here is a hint: in System Mechanic, after a bad file scan,
or registry scan, is done a remove button will appear. To the
right of the remove button is a little arrow. Click it, select
Delete All Files. Exit the program.
Defragment:
First, run Scandisk (click Start, Programs, Accessories,
System Tools, Scandisk) and correct all the errors on your hard
drive. Then defrag your hard drive with a good defragmenting program.
This may take anywhere from 15 minutes to 5+ hours, depending
on how badly your drive is fragmented. This
is VERY important to do! The longer it takes, the
more you needed it. Once you are done, remember to do it once
a week (it'll take far less time, next time). Most defrag programs
have an analysis function that lets you check how fragmented the
drive is. Use it often, and defrag when needed. Reboot when the
defrag is completed.
Virtual Memory:
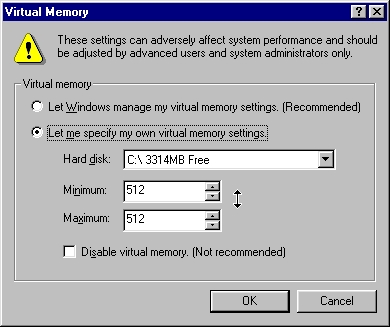
AFTER you have defragged, in the System Properties
window, click Virtual Memory. There is a lot of debate about virtual
memory. In most cases, its best to manage it yourself rather than
let Windows do it. Personally, I set it to a static size twice
as large as the amount of RAM I have. I have 256 megs RAM, so
I set the min and the max to 512. This seems to work good for
most people. The reason for managing it yourself is...if Windows
manages it, Windows will fragment the virtual memory across the
hard drive, and it takes longer to retrieve data from a fragmented
drive. The reason for setting a static size instead of a variable
size is...Windows has to manage this memory...that means it needs
to map and provide addresses. If Windows is forced to manage a
variable sized memory, it takes more of Windows time and energy
than it does to manage a static sized memory where mapping and
addressing have to be done far less. The reason for setting it
to 512? It says so in the WW2OL FAQ ;)
Clean that Hard Drive!
A big part of getting WW2OL to run well on computers
with less than 512 megs RAM (or more, in some cases) is getting
the hard drive running as well and as fast as possible. This is
because WW2OL uses a LOT of virtual memory...virtual memory, or
swapfile, are located on the hard drive. When you hear your hard
drive churning away in there while you are playing, it is accessing
the virtual memory. The faster we can make it do this, the less
FPS spikes we will get. I'm not going to go into partitioning
here, but we can still make sure the drive is running good as
it is. The first thing to do is go thru and get rid of programs,
games, and files you no longer want manually. Be brutal. Anything
you dont use, trash. Any games you have on CD, get em off yer
computer if you dont play em often. Throw out as much as possible,
this isnt about saving room, its about making the drive work more
smoothly. The next thing to do is get a file system cleaner like
System Mechanic from Iolo
and scan for old, dead files. Delete them all. The next thing
to do is to...
Clean up your registry:
Your registry is like a phone book for your computer.
The registry assigns addresses to files and then programs on your
computer use the registry to find the files they need to run.
These files' addresses change sometimes, and the registry updates
itself to those changes, but it does not delete the old addresses.
So when a program needs a file, it goes into the registry and
sees the first address, goes there, finds no file, thinks "hrmm",
and goes back to the registry, where it finds another address.
It then goes there, finds no file...this repeats until it finds
the file it wants or it times out and the program or your entire
computer crashes. There are literally dozens of good registry
cleaning programs out there. The one that comes with Windows kinda
sucks. The registry is the cause of a lot of problems.
Things like peripherals (joysticks) not working, program conflicts
that cause lockups, crashes, blue screens of death, ect. System Mechanic does a great job of cleaning
up the registry. Scan for bad references and then delete ALL of
them. Here is a hint: in System Mechanic, after a bad file scan,
or registry scan, is done a remove button will appear. To the
right of the remove button is a little arrow. Click it, select
Delete All Files. Exit the program.
Defragment:
First, run Scandisk (click Start, Programs, Accessories,
System Tools, Scandisk) and correct all the errors on your hard
drive. Then defrag your hard drive with a good defragmenting program.
This may take anywhere from 15 minutes to 5+ hours, depending
on how badly your drive is fragmented. This
is VERY important to do! The longer it takes, the
more you needed it. Once you are done, remember to do it once
a week (it'll take far less time, next time). Most defrag programs
have an analysis function that lets you check how fragmented the
drive is. Use it often, and defrag when needed. Reboot when the
defrag is completed.
Virtual Memory:
AFTER you have defragged, in the System Properties
window, click Virtual Memory. There is a lot of debate about virtual
memory. In most cases, its best to manage it yourself rather than
let Windows do it. Personally, I set it to a static size twice
as large as the amount of RAM I have. I have 256 megs RAM, so
I set the min and the max to 512. This seems to work good for
most people. The reason for managing it yourself is...if Windows
manages it, Windows will fragment the virtual memory across the
hard drive, and it takes longer to retrieve data from a fragmented
drive. The reason for setting a static size instead of a variable
size is...Windows has to manage this memory...that means it needs
to map and provide addresses. If Windows is forced to manage a
variable sized memory, it takes more of Windows time and energy
than it does to manage a static sized memory where mapping and
addressing have to be done far less. The reason for setting it
to 512? It says so in the WW2OL FAQ ;)
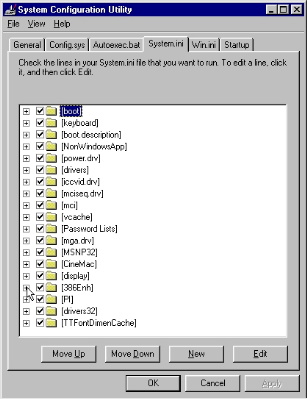
 ConservativeSwapFileUsage=1
This line should be in your system.ini file. One way
to see is to click Start, Run, type msconfig and hit enter. Click
the system.ini tab and scroll down to the [386enh] folder. Click
the + symbol to open this folder and scroll down thru the folder
to see if this line is included. If it is, yer good. If not, add
it. Another way to find the system.ini file is to click Start,
Run, type sysedit and hit enter. Click on the system.ini window
to bring it forward, scroll thru it and add the line if needed.
Another way to find the system.ini file is to click Start, Find,
Files or Folders, and search for system.ini. There is also some
debate on the WW2OL boards about this, but not much elsewhere.
This is considered a great tip for any game that uses a swapfile
(virtual memory), period. This tip does work better for some than
others, here is why: What this line does, basically, is tell your
computer to use all of the physical RAM available before using
the virtual memory. This is good, because RAM is far faster than
virtual memory. RAM is in memory sticks and virtual memory is
on the hard drive. Why do you need to tell your computer to use
all it's RAM? Because Windows like to set aside RAM for itself,
and not let any other programs use it, even if Windows doesn't
need it. This command is available to override that memory hogging.
When Windows hogs some memory, it hogs a percentage of the
available memory. For example, if you have 256 megs of RAM,
and Windows decides it wants to hog 10% (I dont know the actual
number), then Windows will hog 25.6 megs of RAM. On a computer
that has 512 megs of RAM, Windows would be hogging 51.2 megs of
RAM. Therefore, the more RAM you have, the more RAM you will free
up using this command. That is why this tip benefits people with
more RAM more than it does people with less RAM. Simple math.
With under 512 megs of RAM, the benefits of this might not be
noticeable, but even if it isn't noticeable to you, it IS
helping. Add to this a few other tips that 'arent
noticeable to you' and suddenly it becomes noticeable ;)
ConservativeSwapFileUsage=1
This line should be in your system.ini file. One way
to see is to click Start, Run, type msconfig and hit enter. Click
the system.ini tab and scroll down to the [386enh] folder. Click
the + symbol to open this folder and scroll down thru the folder
to see if this line is included. If it is, yer good. If not, add
it. Another way to find the system.ini file is to click Start,
Run, type sysedit and hit enter. Click on the system.ini window
to bring it forward, scroll thru it and add the line if needed.
Another way to find the system.ini file is to click Start, Find,
Files or Folders, and search for system.ini. There is also some
debate on the WW2OL boards about this, but not much elsewhere.
This is considered a great tip for any game that uses a swapfile
(virtual memory), period. This tip does work better for some than
others, here is why: What this line does, basically, is tell your
computer to use all of the physical RAM available before using
the virtual memory. This is good, because RAM is far faster than
virtual memory. RAM is in memory sticks and virtual memory is
on the hard drive. Why do you need to tell your computer to use
all it's RAM? Because Windows like to set aside RAM for itself,
and not let any other programs use it, even if Windows doesn't
need it. This command is available to override that memory hogging.
When Windows hogs some memory, it hogs a percentage of the
available memory. For example, if you have 256 megs of RAM,
and Windows decides it wants to hog 10% (I dont know the actual
number), then Windows will hog 25.6 megs of RAM. On a computer
that has 512 megs of RAM, Windows would be hogging 51.2 megs of
RAM. Therefore, the more RAM you have, the more RAM you will free
up using this command. That is why this tip benefits people with
more RAM more than it does people with less RAM. Simple math.
With under 512 megs of RAM, the benefits of this might not be
noticeable, but even if it isn't noticeable to you, it IS
helping. Add to this a few other tips that 'arent
noticeable to you' and suddenly it becomes noticeable ;)
 LoadLocalHigh=1
While you are in your system.ini file, you should take
a look in the [386enh] folder and make sure the line LoadLocalHigh=1
is present. What this does is tell the computer to load all system
settings into the upper memory area. It moves these settings out
of memory that games can use and into memory that games
cant use, thereby giving a slight increase in performance.
If the line doesnt exist in your system.ini file, go ahead and
add it, then reboot.
Display Settings:
The easy way to get into the display settings is to
right click on the desktop and click Properties. First, get rid
of that wallpaper and just have a color. Select (None) in both
wallpaper and pattern. If you wish to change the color, click
the Appearance tab and in the Item dropdown, select Desktop, and
choose a color from the colorbox on that row. Next, click on the
Settings tab. This is important: make sure your desktop colors
are set at High Color (16 bit) and not 32 bit! Some people
will say this makes no difference. They are utterly wrong. Its
very important for 3D games, no matter what resolution you run
them at. The only exception to this rule is when running some
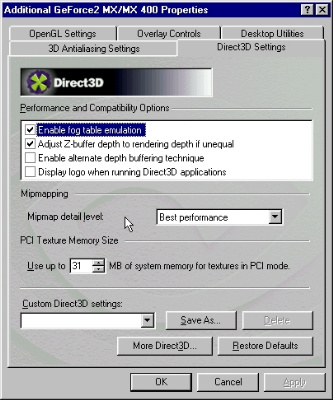
OpenGL applications. WW2OL does not run in OpenGL. Next, click
on the Advanced button, click on the Performance tab and make
sure Hardware Acceleration is set to Full. For GEForce cards,
there is a GEForce page
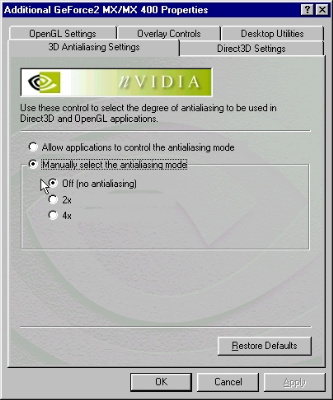
with specific tips for those cards. For the rest, basic rules
in Direct3D are turn anti-aliasing off, turn of FSAA, disable
Vsync.
LoadLocalHigh=1
While you are in your system.ini file, you should take
a look in the [386enh] folder and make sure the line LoadLocalHigh=1
is present. What this does is tell the computer to load all system
settings into the upper memory area. It moves these settings out
of memory that games can use and into memory that games
cant use, thereby giving a slight increase in performance.
If the line doesnt exist in your system.ini file, go ahead and
add it, then reboot.
Display Settings:
The easy way to get into the display settings is to
right click on the desktop and click Properties. First, get rid
of that wallpaper and just have a color. Select (None) in both
wallpaper and pattern. If you wish to change the color, click
the Appearance tab and in the Item dropdown, select Desktop, and
choose a color from the colorbox on that row. Next, click on the
Settings tab. This is important: make sure your desktop colors
are set at High Color (16 bit) and not 32 bit! Some people
will say this makes no difference. They are utterly wrong. Its
very important for 3D games, no matter what resolution you run
them at. The only exception to this rule is when running some
OpenGL applications. WW2OL does not run in OpenGL. Next, click
on the Advanced button, click on the Performance tab and make
sure Hardware Acceleration is set to Full. For GEForce cards,
there is a GEForce page
with specific tips for those cards. For the rest, basic rules
in Direct3D are turn anti-aliasing off, turn of FSAA, disable
Vsync.
 ~~~~~~~~~~~~~~~~~~~~~~~~~~~~~~~~~~~~~~~~~~~~~~~~~~~~~~~~~~~~~~~
Benchmark:
Time for your first benchmark. Go to Mad Onion and get the 3DMark program suited to your computer. The
3DMark programs are unlimited shareware and are free to use, as
is the
Online Results Browser on thier website. One of the purposes
of this benchmark is to compare to other real life computers.
You dont need to wonder if your score is good or bad, you simply
go to the Online Results Browser (ORB) and compare to
a computer exactly the same as your own. Run it at the default
settings and when done, click the button under your score to 'Publish
Results Online'. The service is free and your results will be
added to a database of thousands of other users. You can then
compare your results to another person's...or you may share your
specific results...by providing a link to the comparison, thus:
P3@501, 256 RAM, GEForce2 MX-400. The actual
link looks like this: http://gamershq.madonion.com/compare2k1.shtml?1351678
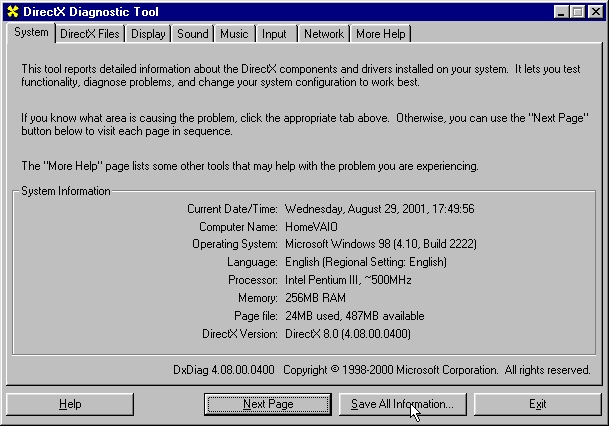
Useful commands to know:
Click Start, Run, type dxdiag and hit enter. An applet
will search your computer and a window with many tabs will pop
up. This can tell you many things about whats working on your
computer. You can save a file of this information by clicking
the "Save All Information..." button under the "System"
tab. Save as a text file and remember where you put it. Exit the
diagnostic applet and click Start, Run, and browse to the text
file you just saved, open it, copy it, and you can paste that
in the message boards so folks can help you.
~~~~~~~~~~~~~~~~~~~~~~~~~~~~~~~~~~~~~~~~~~~~~~~~~~~~~~~~~~~~~~~
Benchmark:
Time for your first benchmark. Go to Mad Onion and get the 3DMark program suited to your computer. The
3DMark programs are unlimited shareware and are free to use, as
is the
Online Results Browser on thier website. One of the purposes
of this benchmark is to compare to other real life computers.
You dont need to wonder if your score is good or bad, you simply
go to the Online Results Browser (ORB) and compare to
a computer exactly the same as your own. Run it at the default
settings and when done, click the button under your score to 'Publish
Results Online'. The service is free and your results will be
added to a database of thousands of other users. You can then
compare your results to another person's...or you may share your
specific results...by providing a link to the comparison, thus:
P3@501, 256 RAM, GEForce2 MX-400. The actual
link looks like this: http://gamershq.madonion.com/compare2k1.shtml?1351678
Useful commands to know:
Click Start, Run, type dxdiag and hit enter. An applet
will search your computer and a window with many tabs will pop
up. This can tell you many things about whats working on your
computer. You can save a file of this information by clicking
the "Save All Information..." button under the "System"
tab. Save as a text file and remember where you put it. Exit the
diagnostic applet and click Start, Run, and browse to the text
file you just saved, open it, copy it, and you can paste that
in the message boards so folks can help you.
 ~~~~~~~~~~~~~~~~~~~~~~~~~~~~~~~~~~~~~~~~~~~~~~~~~~~~~~~~~~~~~~~~~~~~~~
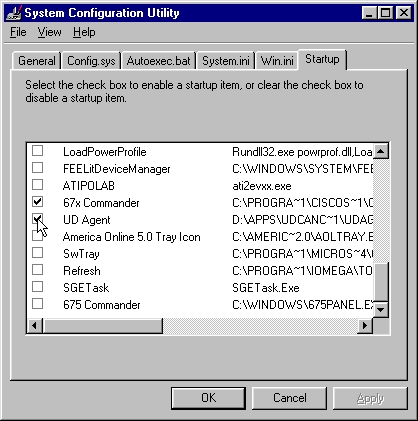
Click Start, Run, type msconfig and hit enter. A window
will open with some startup options and some tabs named for files.
Click on "Startup" and uncheck anything you dont really
use. This is a great way to free up available system resources,
and the more of this stuff you disable (you can always go back
and re-check the box to enable it again) the more system resources
you will have free...dont remove System Tray though...everything
else is safe ;)
~~~~~~~~~~~~~~~~~~~~~~~~~~~~~~~~~~~~~~~~~~~~~~~~~~~~~~~~~~~~~~~~~~~~~~
Click Start, Run, type msconfig and hit enter. A window
will open with some startup options and some tabs named for files.
Click on "Startup" and uncheck anything you dont really
use. This is a great way to free up available system resources,
and the more of this stuff you disable (you can always go back
and re-check the box to enable it again) the more system resources
you will have free...dont remove System Tray though...everything
else is safe ;)
 ~~~~~~~~~~~~~~~~~~~~~~~~~~~~~~~~~~~~~~~~~~~~~~~~~~~~~~~~~~~~~~~~~~~~~
Checking system resources? On your desktop or in your
Windows Explorer, right click on My Computer, click Properties,
and click the "Performance" tab. BTW, your file system
and virtual memory should both be 32-bit. A good system will be
running around 88-92% after cleaning up and rebooting.
~~~~~~~~~~~~~~~~~~~~~~~~~~~~~~~~~~~~~~~~~~~~~~~~~~~~~~~~~~~~~~~~~~~~~
Checking system resources? On your desktop or in your
Windows Explorer, right click on My Computer, click Properties,
and click the "Performance" tab. BTW, your file system
and virtual memory should both be 32-bit. A good system will be
running around 88-92% after cleaning up and rebooting.
 ~~~~~~~~~~~~~~~~~~~~~~~~~~~~~~~~~~~~~~~~~~~~~~~~~~~~~~~~~~~~~~~~~~~~
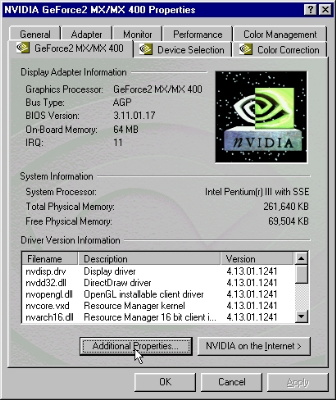
How to check graphics settings? Right click on your
desktop, click Properties, click "Settings" tab, click
"Advanced" button, and click on the tab with your graphics
card. While you are in there, click on the "Performance"
tab and make sure hardware acceleration is set to "full".
While you are in your graphics card, make sure Anti-Aliasing is
turned off. This will make a HUGE improvement in the game.
Congratulations!
That finishes the basic part of tuning. I may come
back and add more to this page, as I am sure I've forgotten something.
Now that you have a basic benchmark of your machine and you have
the hard drive cleaned up and organized (note the 3DMark doesn't
test hard disks), you can start trying out new drivers and other
tricks and compare your benchmark with these to your baseline
benchmark you just created.
~~~~~~~~~~~~~~~~~~~~~~~~~~~~~~~~~~~~~~~~~~~~~~~~~~~~~~~~~~~~~~~~~~~~
How to check graphics settings? Right click on your
desktop, click Properties, click "Settings" tab, click
"Advanced" button, and click on the tab with your graphics
card. While you are in there, click on the "Performance"
tab and make sure hardware acceleration is set to "full".
While you are in your graphics card, make sure Anti-Aliasing is
turned off. This will make a HUGE improvement in the game.
Congratulations!
That finishes the basic part of tuning. I may come
back and add more to this page, as I am sure I've forgotten something.
Now that you have a basic benchmark of your machine and you have
the hard drive cleaned up and organized (note the 3DMark doesn't
test hard disks), you can start trying out new drivers and other
tricks and compare your benchmark with these to your baseline
benchmark you just created.